


Best Healing Champions in Raid Shadow Legends
In this guide, we explore the importance of healing champions in Raid Shadow Legends. We break down how healing works, why it plays a crucial role in your team’s survival, which champions provide it most effectively, and where you’ll get the most value from using it.
What healing does in raid
How Healing Abilities Work
Healing abilities restore lost health to allies during battle, allowing champions to recover from damage and stay alive longer. When a healing skill is used, it replenishes a portion of a champion’s missing HP, either for a single target or the whole team, depending on the ability. This helps offset incoming damage, keeps your team stable during fights, and is especially important in longer battles where sustained damage would otherwise wear your team down over time.
There are several types of healing, each working in slightly different ways depending on the champion’s skill. Some abilities equalise HP, redistributing health across the team so that weakened allies are brought up to those with greater current HP. Others heal based on a percentage of MAX HP, either based on the caster or the targets. Additionally, healing can come from buffs like Continuous Heal, which restore a portion of a champion’s HP at the start of each turn or instant activation, offering steady recovery over time rather than a single burst of healing.
Why Healing Is Important
Healing is important because it allows your team to recover from damage and stay alive throughout a fight, especially in longer battles where incoming damage adds up over time. Without healing, your champions will gradually be worn down, but consistent healing helps maintain their health, supports other defensive effects like shields, and keeps your team stable so they can continue dealing damage and using their abilities effectively.
Why healing champions are valuable

Sustaining Teams in Long Battles
Healing allows teams to survive extended fights against bosses by continuously restoring lost HP, helping offset the damage bosses deal over time. In long encounters like Clan Boss or Doom Tower bosses, damage builds up, so without healing your team could eventually be worn down. Consistent healing keeps champions sustained, supports other defensive mechanics like shields and Ally Protection, and ensures your team can stay alive for more turns, which is key to maintaining damage output and completing the fight.
Recovering From Heavy Damage
Healers help stabilize teams after enemy attacks by restoring HP and bringing champions out of danger before the next hits. After a heavy attack, champions can often be left low on health and at risk of being wiped, but strong healing can recover that lost HP, prevent follow up kills, and give your team a chance to reset and continue the fight. This makes runs much safer and more consistent, especially against bosses or waves that deal high burst damage.
Best areas to use healing champions
Demon Lord, Hydra & Chimera Clan Boss
Healing helps teams survive repeated boss attacks in fights like Chimera, Hydra, and Demon Lord Clan Boss by continuously restoring HP, allowing your team to recover from hits and stay alive over long encounters where damage steadily wears you down. This makes it possible to withstand constant pressure, keep your team stable, and maintain damage output across many turns.
However, in Hydra, the Head of Decay adds an extra challenge by destroying a champion’s MAX HP whenever they are healed (based on a portion of the healing received, up to a cap), which weakens the effectiveness of healing. Because of this, it’s important to either bring Restore MAX HP effects to counter it or prioritise taking down that head quickly to heal & restore your health.
Due to the nature of these fights, success is measured by how much damage you can deal before reaching the turn limit or your team is defeated, rather than how quickly you can finish the encounter. With key reward thresholds tied to higher damage, maximising your output is essential – this is where Healing play a key role, helping your team survive longer to reach those higher milestones.
Doom Tower & Dungeons
Healing improves survivability during difficult dungeon and Doom Tower runs by allowing your team to recover from the constant damage taken across waves and boss fights. In these encounters, damage adds up quickly, especially from hard hitting enemies, so consistent healing helps keep your champions healthy and prevents them from being worn down over time. This makes your team more stable, reduces the chance of losing key champions, and allows you to push through tougher stages more reliably.
Best Healing champions in raid
Here we’ve highlighted some of the top Healing champions in Raid: Shadow Legends, showcasing the different strengths they bring. While this list isn’t exhaustive, it should give you an understanding of what makes these champions so effective. For more options, be sure to check out our Champion Tier List.
Marichka

Marichka is one of the most powerful champions in Raid, able to restore and heal allies by 40% before placing Shields and Strengthen in a single skill. This combination provides both recovery and strong protection for your team. Alongside this, she can counter HP Burn, Bombs and Poisons, cleanse debuffs, and boost Turn Meter, while her passive allows her to revive allies upon being defeated. This all round utility makes her a top-tier choice across all areas of the game.
Rector Drath

Through Rector Drath’s A2, she heals all allies, then places Perfect Veil on those at full HP or Continuous Heal on those below full HP after the heal. This makes her a strong counter to the Head of Torment while providing consistent team sustain. Her revive brings an ally back with 60% HP and Turn Meter, alongside Perfect Veil to immediately protect them. She also passively enhances allies under Veil by providing additional healing and 50 RES, adding further survivability to your team.
Oella

Oella is a powerful healing support, able to heal all allies by 30% of their MAX HP while also increasing buff durations within the same skill. Alongside this, she can boost ally Turn Meters, apply Increase RES to help counter incoming debuffs, and passively grant Continuous Heal to allies when they take big hits, making her a strong and versatile option across a wide range of content.
Wythir

Wythir covers a wide range of roles as a support champion, pairing a strong 30% heal with a full team cleanse to counter debuff-heavy encounters while sustaining your team. She also applies Increase DEF, helping to further reduce incoming damage. She can extend and activate Continuous Heals on allies, which she also places passively on your most vulnerable champion each turn. Alongside this, she brings an AoE Leech chance a random Continuous Heal on her A1, making her a highly reliable option for both sustain and long fights.
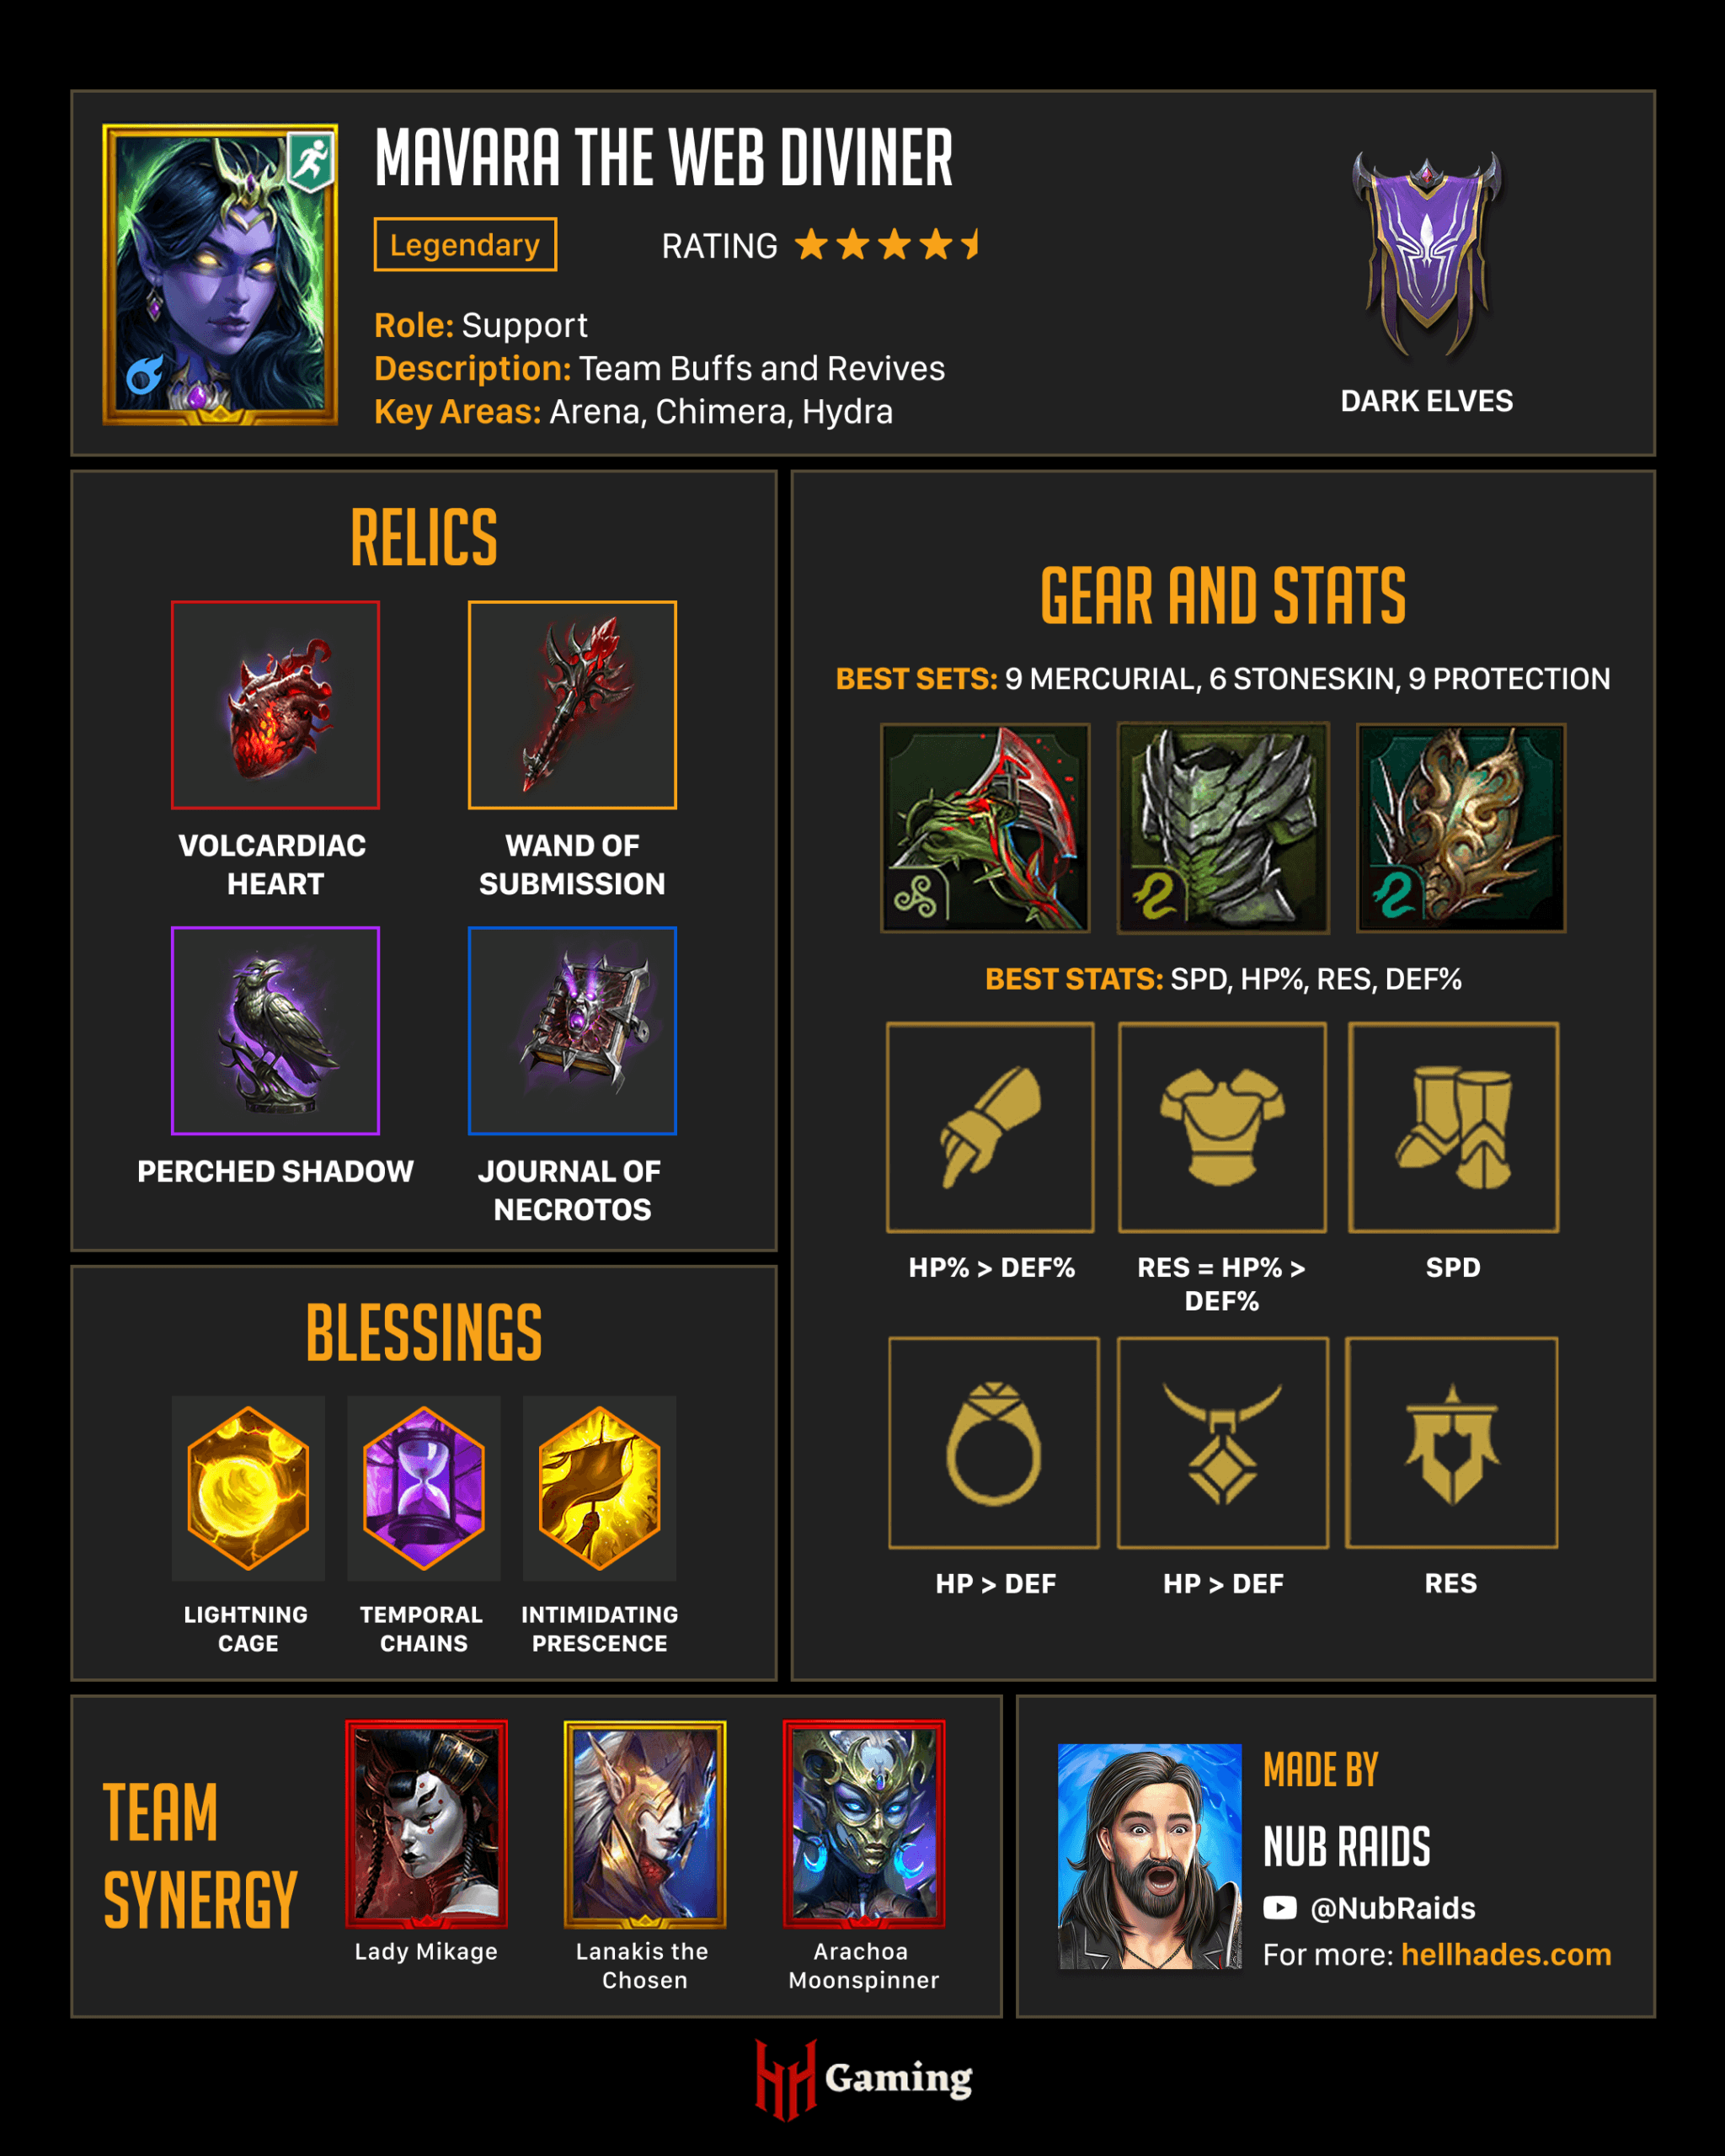
Mavara

Mavara’s healing comes through her A2, where she applies Strengthen and Increase RES to help mitigate incoming damage and debuffs, before equalising ally HP to match the highest on the team. This allows for strong team wide recovery, especially after heavy hits. She also passively enhances sustain, healing allies by 20% every time your team receives 16 buffs, while granting Turn Meter boosts when enemies recieve 8 buffs. Alongside this, she brings a powerful single-target revive, Perfect Veil for encounters like Hydra, and uses Fervor on her A1 to fuel ally attacks, making her a well-rounded support option.
Skytouched Shaman

Skytouched’s healing comes from her passive, which damages her by 10% of her MAX HP each turn while also placing Decrease SPD and chance to Fear on herself. In return, she heals all allies based on half of her current HP, allowing for strong, consistent healing without relying on active skills. As her HP drops, the healing becomes more impactful, but this also means she needs support to sustain herself – whether through her A1 self-heals or allied support, and potentially a reviver if she falls. Alongside this, she can provide Block Debuffs and Revive on Death, adding further utility and protection for the team.
Elva

Elva Autumnborn is very strong for waves and bosses thanks to her combination of passive healing for the team, cleansing, and powerful team buffs, which help keep your team alive in difficult encounters. Her ability to remove debuffs, place Block Debuffs, and Increase SPD allows your team to outpace enemies and counter incoming effects. Her single-target revive adds an extra layer of safety, making runs more consistent, though recovering from multiple allies being defeated at once can be more challenging.
Acolyte

This Rare rivals Apothecary as one of the top support options, offering a strong mix of healing and speed control. He can apply the small version of Decrease SPD to enemies, with the potential to upgrade it through Nature’s Bounty, while also healing allies by 15%. Combined with his ability to Increase SPD, boost ally Turn Meters by 15%, and manipulate enemy Turn Meter through his A1, he becomes a very strong option for progression, helping your team cycle turns faster while staying sustained.
Apothecary

This classic Rare has stood the test of time as one of the best progression champions. His healing comes from his A2, restoring a target by 35% HP and capable of critically healing, allowing you to consistently support your most vulnerable allies. Alongside this, he boosts Turn Meter and applies Increase SPD, helping your team cycle turns faster and outpace enemies. He also brings a 21% DEF Aura for Dungeons, adding extra survivability for your team.
Senna

Senna is undoubtedly one of the best champions in the game. Her passive Turn Meter boosts, triggered by Continuous Heals activating on allies, which she can also place herself, allows your team to cycle turns & heal far more frequently, helping you outpace both waves & bosses. This level of speed manipulation, Continuous Heal activations, combined with an AoE revive that also triggers an Ally Attack, makes her an incredibly powerful option for maintaining momentum throughout the fight.
How to build healing Champions
Speed & Health Requirements
Building healing champions effectively comes down to prioritising Speed and survivability stats, especially HP, depending on how their healing scales. Many healers restore health based on a percentage of their own MAX HP, so stacking high HP directly increases the strength of their heals, making them much more impactful in keeping the team alive.
Speed is equally important, as faster healers can take turns more often, allowing them to use their healing abilities more frequently and respond quickly to incoming damage. This combination of high HP for stronger heals, DEF for further sustain, and high Speed for better uptime ensures your healer can consistently support and stabilise the team throughout longer fights.
Recommended Artifact Sets
Support champions typically benefit from artifact sets that improve their survivability, speed, and utility, allowing them to stay alive and consistently support the team. Sets like Immortal and Regeneration are great for self-sustain, helping healers and supports recover HP over time, while Mercurial provides strong stat boosts and protection through Total Guard stacks. In PvP, Stoneskin is valuable for keeping key support champions alive and protected from burst damage. For general use, Speed and Impulse sets are excellent choices, as they allow support champions to cycle turns faster and use their abilities more frequently.
If a support champion also provides important buffs alongside healing, sets like Protection become very powerful, as they can help prevent buffs from being stolen or removed while also boosting the team’s damage. For champions that combine support with debuffing, such as Riho Bonespear, sets like Perception and Feral are strong options, as they provide the Accuracy needed to land debuffs while still offering useful stat bonuses to maintain overall effectiveness.
Tips for using healing Champions
When using healing champions effectively, it’s important to build your team in a way that supports their impact. Healing works best when combined with defensive buffs like Increase DEF, Strengthen, and Shields, as these reduce incoming damage before or alongside the healing, making each heal more meaningful and easier to sustain over time. Shields can absorb initial damage, while healing can restore any HP lost, creating a strong layered defense that keeps your team stable through heavy hits and extended fights.
It’s also essential to protect your healer, as they are often the backbone of your team’s survivability. If your healer is lost early, the rest of your team can quickly fall apart due to a lack of recovery. Building them with strong HP, DEF, and Speed, and supporting them with buffs, crowd control, or even revivers, ensures they stay alive long enough to consistently heal and stabilise the team.
Might be wise to put in the bottom a link to a group page for guides like this with the how to build stuff. It might be also helpful if the comment box didnt have white text. White text on a white background is bad for the commenter to read what has been typed before posting.
Cannot have a list of top healers in this game without including Androc the Glorious. I take him with me everywhere! I wouldn’t swap him for anybody on that list.
If you are talking straight healers than Opardin Clanfather needs to be on the list, he brings a direct heal with his A2, continuous heals and block debuffs on his A3 and every time a continuous heals ticks it increases turn meter by 10%.
I give him a solid 4.5 as the only thing keeping him from being OP is the lack of a revive .